Some of the questions that I get asked quite frequently are “Are my trees ok?”, “Do I need to have an arborist come work on my trees?”, and “Is there anything I can do to help my trees without hurting my savings?”. Just like many questions, the answers are dependent on the situation. There are a multitude of cases where it is in the best interest of both you and the tree to hire a professional. From removals and storm damage, to pruning at height and/or around utilities, and other dangerous situations, you really should invest in the cost of a certified arborist. But there are instances where you can save some money and feel the pride of caring for your trees yourself by doing some of your own pruning work.
You might not think too much about pruning. Maybe you feel like “Hey! Anyone can cut off a branch”, and you’re right but also not. There is a right and wrong way to pruning and cleaning out dead wood. Depending on where you cut and how much you remove, you might end up doing more damage to your tree and end up requiring the assistance of an arborist earlier than needed. For the pruning layperson, there are several topics that can help you prune like a pro: safety, equipment, and proper pruning cuts.
First and foremost is safety. From this time of the year onward it’s only going to get hotter, but it’s important to protect your body from accidents with your tools, from the elements, and even from the plants you’re pruning by wearing the proper personal protective equipment (PPE). From the toes up, skilled professionals have their work boots (closed toed shoes), pants (not shorts), at the very least a t-shirt, gloves and safety glasses, and hearing and head protection depending on the equipment and scale of work. And if you’re using power equipment like chainsaws make sure you’ve got protective chaps for that added level of safety.
The standard equipment available for pruning includes hand pruners, loppers, and hand and pole saws (I’ll touch on chainsaws more in a later article). The two main types of pruners and loppers are called bypass and anvil styles. Bypass pruners have two blades that “bypass” each other like scissors, leaving clean cuts on your trees and shrubs. Anvil pruners have a single blade that shuts against a flat surface, the “anvil”, and can leave bruised or crushed plant material after cuts. Use your hand pruners for smaller cuts (up to 3/4” in diameter depending on the quality of your blade) and your loppers for larger diameters that might not require a hand saw.
When choosing a hand or pole saw, it is best to have one specifically designed for pruning. Pruning saws come in different configurations. They can be straight or curved, have fixed or folding blades, and come in different lengths and teeth sizes. A good rule of thumb is shorter blades or blades with smaller teeth for finer pruning cuts and longer blades with larger teeth for bigger diameter limbs (pole saws will usually have larger blades attached to single or extendable poles). You’ll also want a blade that isn’t so thin that it buckles on the first cut. For pruning at home, I recommend a 10-12” saw with medium sized teeth. That coupled with a hand pruner and some loppers should cover most of your pruning projects.
Now that you have your PPE and your pruning equipment you’ll want to begin cutting, but there are some considerations along with dos and don’ts for pruning. First, you want to decide what your goals are (raising the canopy off the ground or a building, thinning the crown to increase light and/or wind, or reducing the canopy by shortening limbs) and how much you need to remove from your tree (Fig. 1). In most cases, less is more. Whenever you remove plant material you are doing two things:
-

- Figure 1a: Examples of canopy reduction, thinning, and raising (FNR-506-W).
-

- Figure 1b: Examples of canopy reduction, thinning, and raising (FNR-506-W).
1) you are injuring the tree, exposing open cuts to pests, diseases, and the elements
2) you are removing plant material that could continue to create energy for the tree if left on.
Both will stress your tree and it will need time to adapt and heal. You can always remove more later, but once you make your cuts you cannot put them back. If your tree needs a heavier prune, it’s time to bring in an arborist.
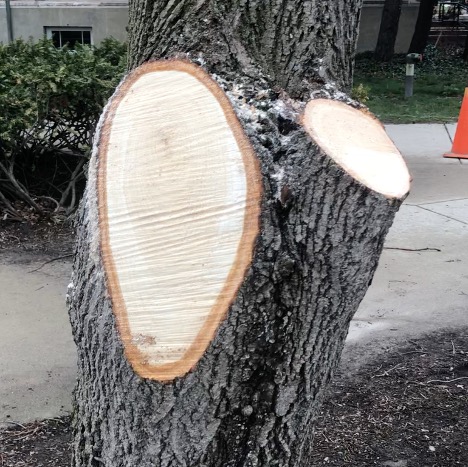
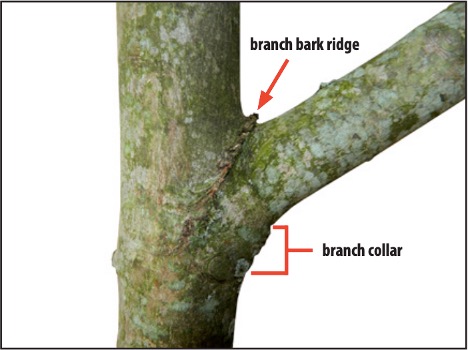
Next you need to consider what are you cutting? Are you removing whole limbs back to the trunk or are you shortening limbs? If you are removing limbs you want to avoid flush cuts, cutting back even to the trunk. Flush cuts (Fig. 2) are usually oval and have a larger surface area exposing more of the tree to pests, diseases, and the elements. Instead, you want to cut up to the branch bark ridge, a raised portion of bark on the top of the limb where it meets the trunk, and the branch collar, usually a swollen area on the bottom side of the limb where it begins to flare out from the trunk (Fig. 3). This is a proper removal cut that has the smallest surface area exposed and is usually more circular than oval.
-

- Figure 2: Examples of a flush cut (left) and a proper removal cut (right)
-

- Figure 3: Identifying the branch bark ridge and the branch collar for proper removal cuts (FNR-506-W).
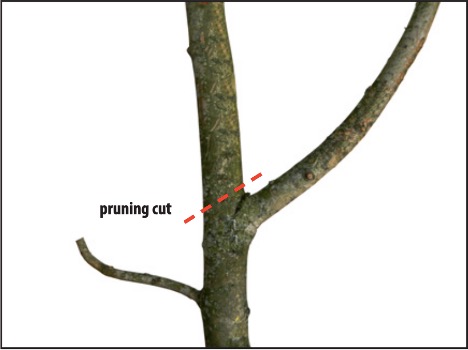
If you are shortening limbs you want to perform a reduction cut, which is removing a larger stem by cutting back to a lateral branch that is at least 1/3 the diameter of the portion you are removing (Fig. 4). This provides sufficient energy production the keep the remaining limb alive. In this situation, you want to avoid heading cuts, which are length reductions without regard to the position or diameter of the lateral branch you are cutting back too. Cutting too far away from the lateral will lead to dead stubs that increase exposure and the time needed to heal over wounds. Cutting to laterals that are too small won’t allow the limb to produce enough energy to survive.
-

- Figure 4: Correct placement of a reduction cut to an properly sized lateral branch (FNR-506-W).
-

- Figure 5: The 3-cut method for safe removal of limbs (FNR-506-W)

Last, whether you are applying removal or reduction cuts, you want to utilize what is called the ternary or 3-Cut Method (Fig. 5). The purpose of this method to stop damage from splitting and tear-outs in larger limbs that can’t be controlled by hand. The first cut is the undercut, about 1/3 the diameter of the limb and usually 6-12 inches from your final cut. The second cut is the top cut just outside the undercut. This cut continues down until it meets the same plane as the undercut where gravity will take hold as the branch snaps and falls. The final cut is to the branch collar, or the chosen lateral as noted above.
Proper pruning can be a daunting task at first. With time, the correct materials, and practice you can better care for your trees, your landscape, and yourself. If you are still worried about your trees, there are plenty of resources at Purdue Extension and The Education Store or you can always find an ISA Certified Arborist nearby using the Trees Are Good website. They will be able to help assess any other issues and provide excellent professional help.